Understanding the critical differences between insert molding and overmolding is pivotal, not just for manufacturing efficiency but for enhancing product performance, durability, and market competitiveness. In this comprehensive guide, we’ll dissect insert molding and overmolding, shining a clear spotlight on their specific processes, materials, tooling considerations, and real-world use cases.
What is Insert Molding?
Insert molding is a process where molten plastic is injected around a non-plastic insert—usually metal—placed into a mold. Once cooled, this creates a single, integrated part with enhanced mechanical strength.
Example: Think of a screwdriver with a metal shaft and plastic handle formed in one molding cycle.
Insert Molding Applications
Insert molding proves invaluable across sectors such as aerospace, automotive, medical devices, and electronics, where strength, reliability, and precision are paramount. Common applications include:
- Threaded metal inserts in electronic housings, providing robust fastening points without secondary operations.
- Electrical connectors, where metal contacts are molded directly into plastic housings, ensuring superior conductivity and insulation.
- Automotive components like sensor housings, where metal inserts reinforce structural integrity, reducing risks of component failure under stress.
What is over Molding?
Overmolding involves molding a base plastic part (the substrate), then covering it with a secondary plastic or elastomer material. This method enhances grip, ergonomics, and visual appeal.
Example: The soft rubber grip on a toothbrush or power tool handle.
Over Molding Applications
Overmolding shines brightest in consumer products, sporting goods, healthcare equipment, and specialized industrial applications. Examples include:
- Soft-grip handles on power tools, enhancing comfort and reducing user fatigue.
- Medical diagnostic cartridges with integrated seals, preventing leaks and contamination without separate assembly steps.
- Consumer electronics, such as smartphones or controllers, featuring textured rubber overmolds for better handling and drop protection.
Difference between insert molding and over molding
Insert Molding Process:
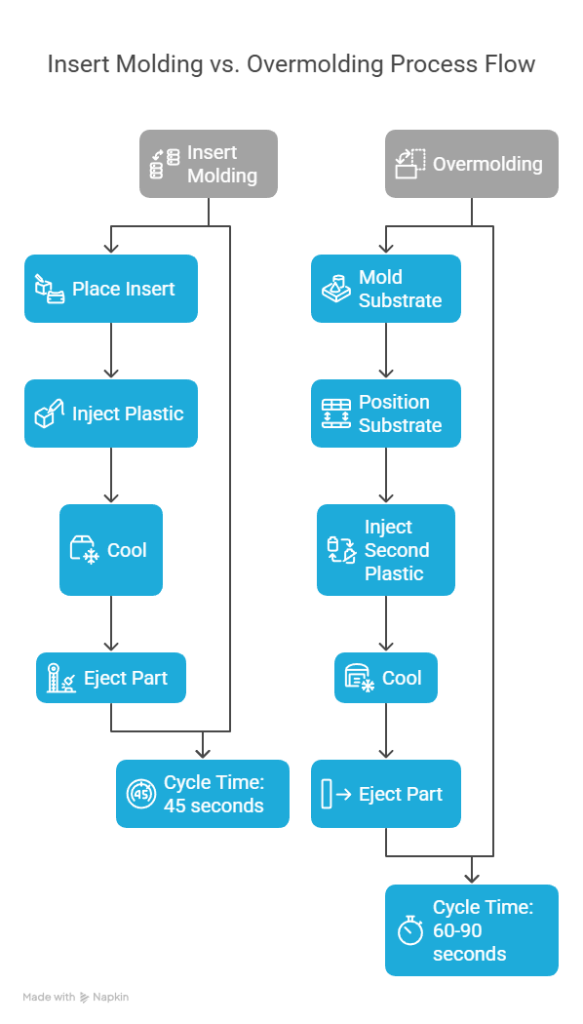
Step 1: Insert Placement
Before molten plastic ever enters the mold, precise placement of the insert is critical. This insert—typically metal, wire, or another rigid material—is either manually or robotically positioned in the mold cavity. Automation is common to ensure consistency, accuracy, and speed, minimizing errors due to human handling.
Step 2: Injection of Molten Plastic
Next, molten plastic material is injected under high pressure into the cavity, completely encapsulating the insert. The success of this step hinges heavily on proper mold design and injection parameters such as temperature, pressure, and injection speed. Any variation can lead to incomplete encapsulation or weak mechanical bonds.
Step 3: Cooling and Ejection
Once filled, the mold cools rapidly, solidifying the plastic around the insert. After cooling (often within seconds), the integrated part is ejected, ready for immediate use or further processing.
Critical Considerations:
- Precision is Key: Misplaced inserts can cause part rejection or structural weaknesses.
- Cycle Efficiency: Short cycle times enhance productivity, making insert molding highly attractive for projects requiring quick turnaround or moderate volume.
Over Molding Process:
Step 1: Initial Substrate Molding
In this stage, the base (substrate) component—usually a rigid plastic—is injection molded first. This substrate must have precise dimensions, smooth surfaces, and excellent structural integrity. Errors here can jeopardize subsequent overmolding steps.
Step 2: Secondary Material Injection
Once the substrate is molded and adequately cooled, it moves to a second mold cavity (or a rotating platen mold in two-shot molding). Here, the secondary material, typically softer plastic or elastomer (such as TPE or TPU), is injected over the substrate.
Critical Considerations:
- Precise Alignment: Misalignment during substrate transfer can severely impact product integrity, leading to costly defects.
- Chemical Compatibility: Ensuring strong chemical and thermal bonding between the substrate and overmold materials prevents delamination and structural failure.
Material Compatibility and Selection
Insert Molding Compatibility
Insert molding enjoys broad compatibility due to its metal-plastic integrations. Common combinations include:
Plastics: ABS, Nylon, Polycarbonate, PEEK
Metals: Steel, Aluminum, Brass, Copper
The diversity here allows insert molding to serve high-performance applications like automotive housings, aerospace components, and high-load structural parts.
Overmolding Compatibility
Overmolding demands more careful material matching. Compatible examples include:
ABS + TPE: Common in consumer products due to excellent grip and aesthetic flexibility.
Polypropylene + TPV (Thermoplastic Vulcanizate): Ideal for automotive and appliance seals, offering durability and resilience.
Polycarbonate + TPU: Provides impact resistance and grip for high-end electronics.
Conversely, incompatible pairs such as POM (Delrin) with polyethylene often result in weak bonds and rapid delamination.
Bonding Strength and Durability
Insert molding primarily relies on mechanical retention, where molten plastic firmly encapsulates the insert, creating a robust mechanical bond. This is crucial for parts under substantial mechanical stress, vibration, or thermal variation.
Overmolding depends heavily on chemical and thermal compatibility, resulting in molecular-level bonding. This method is excellent for creating resilient, multi-layered components designed for enhanced durability, aesthetics, and functionality.
Insert Molding Advantages:
- Strong mechanical integration
- Lower tooling costs
- Excellent compatibility with metals and various inserts.
Insert Molding Disadvantages:
- Needs accurate insert placement
- No soft-touch or flexible features
Over Molding Advantages:
- Adds comfort, sealing, and style
- Eliminates adhesives or fasteners
- Enhances product durability, user comfort, and design flexibility.
Over Molding Disadvantages:
- Higher tooling cost
- Needs compatible materials
Case Studies: Learning from Industry Applications
Case Study 1: Medical Device Seals via Overmolding
A prominent medical OEM faced a persistent challenge: traditional o-rings in diagnostic cartridges often became displaced, leading to device failures and expensive recalls. The solution was elegant yet practical—overmolding a TPE gasket directly onto the rigid plastic housing. This eliminated secondary sealing processes, reduced leaks, and significantly improved reliability.
Key takeaway: Overmolding delivered critical functional improvements and cost savings through reduced assembly time and increased reliability.
Case Study 2: Threaded Inserts in Electronics Housing with Insert Molding
A global electronics manufacturer faced frequent thread failures in plastic casings, especially under high mechanical stress during component assembly. Insert molding offered the ideal solution. By encapsulating brass threaded inserts directly into the plastic housing, mechanical strength increased substantially. Assembly efficiency improved, and defects dramatically decreased.
Key takeaway: Insert molding offered robust structural integration and significantly reduced assembly defects.
Case Study 3: Ergonomic Consumer Goods via Overmolding
An outdoor sporting equipment company wanted to enhance customer satisfaction and boost product durability. Overmolding provided the ideal pathway—applying a soft-touch TPU over a rigid plastic handle. This improved grip comfort, product aesthetics, and customer satisfaction, subsequently increasing market share.
Key takeaway: Overmolding effectively improved user experience, aesthetics, and market appeal, demonstrating its value in consumer-driven sectors.
Best Practices for Implementing Insert Molding
- Prioritize Insert Placement Accuracy
Precise positioning of inserts—especially metal threads or electrical connectors—is essential. Utilize robotic automation wherever possible to maintain accuracy, repeatability, and high yield rates. - Opt for Robust Mold Design
A robust mold ensures proper insert retention during injection. Incorporate clear guidelines and quality checks for insert positioning and securement, preventing defects and wasted materials. - Optimize Plastic Selection
Match your plastic material carefully with insert properties—consider thermal expansion rates, chemical compatibility, and end-use environment conditions to ensure long-term structural integrity. - Continuous Quality Control Checks
Regular inspections, from insert placement to finished product, help swiftly identify inconsistencies. Non-destructive testing techniques, such as ultrasonic testing, can quickly detect internal defects.
Best Practices for Successful Overmolding Implementation
- Ensure Material Compatibility Early
Select substrate and overmold materials with proven chemical compatibility. Validate combinations through extensive prototype testing and supplier consultations to avoid costly delamination issues. - Refine Mold Design for Dual Material Integration
Invest in mold designs like rotating platens or two-shot molds. Precision mold tooling ensures accurate alignment, proper material bonding, and aesthetic excellence. - Manage Process Parameters Precisely
Overmolding success hinges on carefully managed injection temperatures, pressures, and cycle times. Slight parameter adjustments can significantly influence bonding quality and part aesthetics. - Comprehensive Prototype and Validation Testing
Utilize extensive prototype phases. Test for mechanical strength, chemical bond integrity, ergonomics, and durability under realistic environmental conditions to confirm that design and materials meet your application’s demands.
Strategic Decision-Making Framework: Insert Molding or Overmolding?
Step 1: Clearly Define Product Objectives
- Structural integrity or ergonomics?
- Is your priority strength (insert molding) or enhanced functionality and comfort (overmolding)?
Step 2: Evaluate Material Constraints
- Do your chosen materials chemically bond effectively (overmolding), or does your design integrate distinct materials like metal and plastic (insert molding)?
Step 3: Analyze Volume and Cost Metrics
- Small-to-medium volume with moderate budgets favors insert molding.
- High-volume, high-performance demands typically justify the higher initial investment of overmolding.
Step 4: Consider Assembly and Operational Costs
- Insert molding significantly reduces assembly operations.
- Overmolding may eliminate secondary finishing processes, offsetting its higher initial tooling cost.
If your part needs strength and metal inserts, insert molding is your go-to. If comfort, aesthetics, or sealing is critical, overmolding will deliver. Use this guide to match your needs with the right process—and don’t hesitate to test and prototype early.
Need help selecting the best option? Reach out for a custom consultation. We’re happy to walk through your design and help you optimize performance and cost.